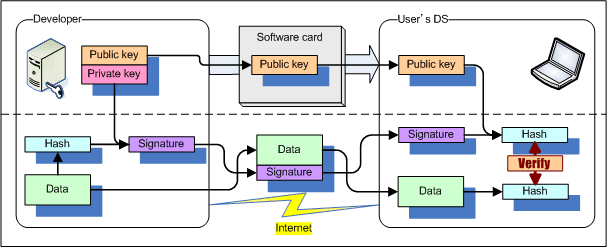
A digital signature is a mechanism for verifying the authenticity of data received from an untrusted route such as the Internet.
Electronic signatures have the following features.
The CRYPTO_VerifySignature function and the CRYPTO_VerifySignatureWithHash function provide the most basic digital signature authentication structure. As there is no certificate layer, there is no feature for managing the certificate expiration period. If necessary, implement a feature in the application. Note: Digital signatures cannot be created with the NITRO-SDK Crypto library.
A digital signature only verifies the legitimacy of the data. Data encryption is not performed. If you only need to avoid sending data unencrypted, you can use the CRYPTO_RC4* function encryption feature. For information on the RC4 algorithm, see RC4 Algorithm Overview. Or, be sure to use SSL communications (enabled using SOC_EnableSsl) for safe communications with the server using the NITRO-SDK WiFi library.
Signature data passed to the CRYPTO_VerifySignature* function can be created using any method as long as it satisfies the conditions listed below.
The following is an example of the procedure for generating a digital signature with OpenSSL from the open source SSL tool kit.
1. Generate an RSA Key for the Signature
Input the following commands in the command line interface installed by OpenSSL to generate a 1024-bit long RSA key file, privkey.pem.
> openssl genrsa -out privkey.pem 1024If this file becomes available, anyone can sign data with it. The private key file therefore needs to be maintained with the strictest precautions.
Password encryption for privkey.pem is possible by specifying the encryption method when generating the key. In the following example, a newly generated privkey.pem file is encrypted with the 3DES algorithm.
> openssl genrsa -des3 -out privkey.pem 1024
For more information, see the openssl reference material.
2. Confirm the Content of the RSA Key
Use the following command to confirm the content of privkey.pem.
> openssl rsa -in privkey.pem -text -noout
It includes the private information needed for signing, but there are also two values needed for verification (via the public key): modulus and publicExponent.
The following is an example of extracted modulus and publicExponent values output from the command.
modulus:
00:eb:95:be:33:19:73:64:f2:72:2c:87:c8:0a:f3:
1c:ba:e0:4c:e0:3e:1d:f6:e2:09:aa:70:f0:b3:b9:
0c:86:36:62:2d:12:13:86:fa:a5:3d:93:cb:5f:0b:
45:64:9b:7b:eb:b5:c6:f9:42:99:70:46:f3:14:6d:
8f:f9:b9:ec:38:30:a0:1c:28:0d:30:d9:86:1a:4d:
1b:f2:e9:05:1b:43:06:b2:c0:55:ed:c4:bb:8e:1a:
a5:ab:2b:54:e5:dc:8d:70:cf:af:91:94:c9:e9:8f:
7f:9f:29:28:be:e7:01:b0:20:d4:f2:71:58:93:db:
25:1c:26:bc:98:f3:a2:b3:47
publicExponent: 65537 (0x10001)
Since the public exponent used by the CRYPTO_VerifySignature* function is fixed at 65537, confirm that publicExponent has a value of 65537.
The modulus value can also be generated with the following command.
> openssl rsa -in privkey.pem -modulus -nooutThis command outputs a text string similar to the following.
Modulus=EB95BE33197364F2722C87C80AF31CBAE04CE03E1DF6E209AA70F0B3B90C8636622D121386FAA53D93CB5F0B45649B7BEBB5C6F942997046F3146D8FF9B9EC3830A01C280D30D9861A4D1BF2E9051B4306B2C055EDC4BB8E1AA5AB2B54E5DC8D70CFAF9194C9E98F7F9F2928BEE701B020D4F2715893DB251C26BC98F3A2B347
The hexadecimal value following Modulus= must be converted to a u8 array in C and passed as mod_ptr to the CRYPTO_VerifySignature function. In the example above, the modulus is 127 bytes long because the leading zeros are omitted when the length is less than 128 bytes. When passing the value to mod_ptr, be sure to restore any leading zeros to maintain a length of 128 bytes.
3. Generate a Digital Signature
Once the above steps are complete, simply create a digital signature for the target data.
The following command uses the privkey.pem private key to generate signed data (hoge.sign) from the unencrypted data (hoge.txt).
> openssl dgst -sha1 -sign privkey.pem -out hoge.sign hoge.txt
Confirm that the resulting file size is 128 bytes.
This 128-byte binary data is transferred to a DS and passed to the CRYPTO_VerifySignature function as sign_ptr.
Run the following command to confirm whether the generated signed data forms a valid digital signature.
> openssl dgst -sha1 -prverify privkey.pem -signature hoge.sign hoge.txt4. Verifying Digital Signatures
By embedding public key data in a DS program in advance, it can then receive data and digital signature data. By providing the CRYPTO_VerifySignature function with the data and the data size, the digital signature data (128 bytes), and the embedded public key data (the 128-byte modulus), the digital signature can be verified. TRUE is returned if the data is valid.
03/07/2006 Initial version.
CONFIDENTIAL